Permission to Play!
Wish to enjoy a relaxing day of printmaking? Have limited equipment or supplies available? New to printmaking altogether? Try creating a monotype print.
Monotypes are one-of-a-kind prints. Unlike other printmaking techniques, such as lithography or etching, mono printing requires less overall effort, allows you to produce multiple prints quickly, and allows you to experiment more freely without the pressure of having to create an edition.
All you require is a plate of metal, plastic, or glass; printing ink(s); a way to apply the ink (e.g., brayer or brush); mark making tools (e.g., rags, pieces of cardboard, Q-tips, or fingers); a selection of found materials, if desired; paper (i.e., any printmaking paper, rice paper, found paper); and either a printing press or a method of hand-printing (i.e., a wooden spoon, barren, or doorknob). Essentially, the cornucopia of one’s home with perhaps the exception of the ink!

The monotypes shown here were all produced in one day using a printing press. In terms of the black and white monoprints, my steps included:
Inking a plastic plate with black printing ink using a small brayer.
Placing pieces of found materials, including cheesecloth, plastic matting, feathers, string and even a piece of white pine to the plate on-top of the ink. It is better to use items that are quite thin and flat overall to avoid tearing the press blankets and/or paper.
In one print, creating marks using the edge of a piece of cardboard on one plate to emulate waves.
Setting the plate on the bed of the printing press, laying a piece of damp Strathmore cream paper on-top of it, and a piece of wax paper on top of that (note: wax paper avoids ink going through to the press blankets).
Running the plate through the press and pulling the resulting print.
Repeating this process using the same plate and materials, without reinking the plate, with new paper.
Printmaking always delights with its ‘happy accidents’ (most times anyway!). For my first black and white print that looks like a landscape, I used a piece of white pine. To my surprise, the resulting image had vibrant green marks from the ‘juices’ of the fresh pine needles!
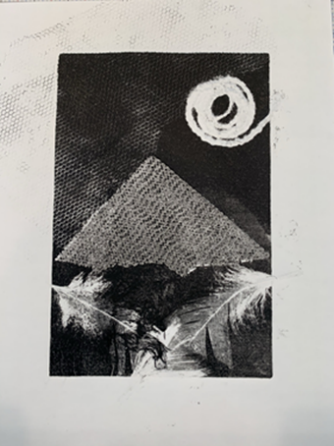
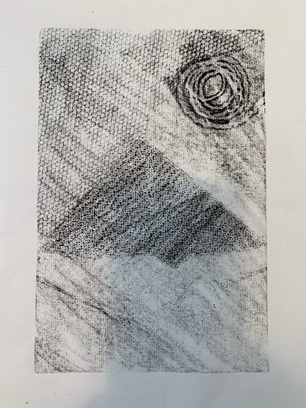
I then created an image with cloth, string and feathers that reminded me of an Egyptian pyramid. While the result was striking, I also like the ghost print which looks like a pencil sketch. To achieve that effect, I took a piece of rice paper, laid it on-top of a plate which had already been printed, removed the materials, and used a wooden spoon to hand print it.
In terms of the colour prints, I followed much the same process as above:

Inking the plastic plate with either one colour or multiple colours.
Laying the found materials on top of the plate or mark making (e.g., with a finger, Q-tip, or piece of cardboard).
Laying a piece of damped paper on-top of the prepared plate on a press bed and running the plate through the press.
This results in a colourful image with white shapes where the materials were located.
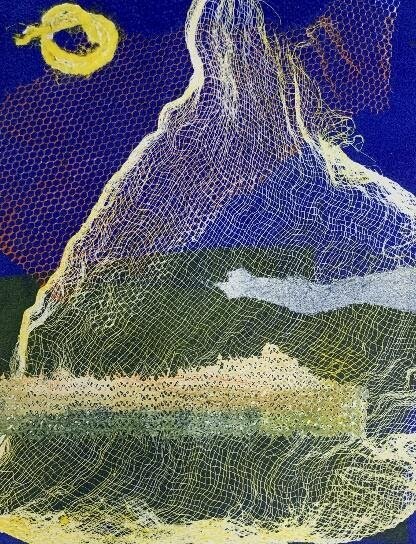
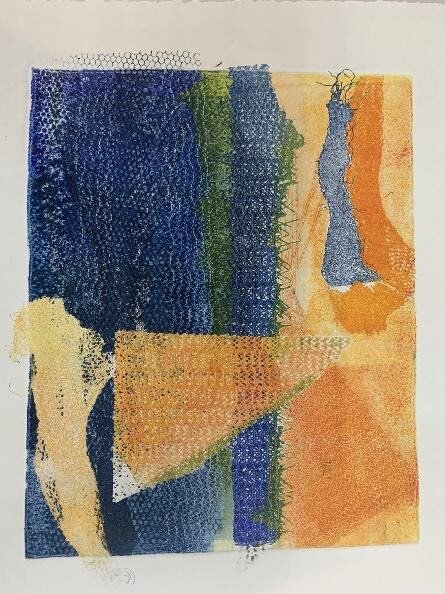
To achieve a multi-varied image with a broader mix of colours, I decided to ink the found materials as well and play with their orientation on the plate. To my mind, this resulted in the most effective image with the dark blue background, yellow sun, and orange mountain.

That is the joy of mono printing. It lends itself to experimentation.
My advice? Collect lots of different materials, play with multiple colours, and give your imagination free rein!!!
Let me know how your own experiments turn out!!!